This guide covers:
-
Compiling the application to a native executable
-
Packaging the native executable in a container
-
Debugging native executable
This guide takes as input the application developed in the Getting Started Guide.
GraalVM
Building a native executable requires using a distribution of GraalVM. There are three distributions: Oracle GraalVM Community Edition (CE), Oracle GraalVM Enterprise Edition (EE) and Mandrel. The differences between the Oracle and Mandrel distributions are as follows:
-
Mandrel is a downstream distribution of the Oracle GraalVM CE. Mandrel’s main goal is to provide a way to build native executables specifically designed to support Quarkus.
-
Mandrel releases are built from a code base derived from the upstream Oracle GraalVM CE code base, with only minor changes but some significant exclusions that are not necessary for Quarkus native apps. They support the same capabilities to build native executables as Oracle GraalVM CE, with no significant changes to functionality. Notably, they do not include support for polyglot programming. The reason for these exclusions is to provide a better level of support for the majority of Quarkus users. These exclusions also mean Mandrel offers a considerable reduction in its distribution size when compared with Oracle GraalVM CE/EE.
-
Mandrel is built slightly differently to Oracle GraalVM CE, using the standard OpenJDK project. This means that it does not profit from a few small enhancements that Oracle have added to the version of OpenJDK used to build their own GraalVM downloads. This enhancements are omitted because upstream OpenJDK does not manage them, and cannot vouch for. This is particularly important when it comes to conformance and security.
-
Mandrel is recommended for building native executables that target Linux containerized environments. This means that Mandrel users are encouraged to use containers to build their native executables. If you are building native executables for macOS, you should consider using Oracle GraalVM instead, because Mandrel does not currently target this platform. Building native executables directly on bare metal Linux or Windows is possible, with details available in the Mandrel README and Mandrel releases.
Prerequisites
To complete this guide, you need:
-
Roughly 15 minutes
-
An IDE
-
JDK 11+ installed with
JAVA_HOMEconfigured appropriately -
Apache Maven 3.8.4
-
A working container runtime (Docker or Podman)
-
Optionally the Quarkus CLI if you want to use it
-
Mandrel or GraalVM installed and configured appropriately
-
The code of the application developed in the Getting Started Guide.
|
Supporting native compilation in C
What does having a working C developer environment mean?
|
Configuring GraalVM
|
If you cannot install GraalVM, you can use a multi-stage Docker build to run Maven inside a Docker container that embeds GraalVM. There is an explanation of how to do this at the end of this guide. |
Version 22.0.0.2 is required. Using the community edition is enough.
-
Install GraalVM if you haven’t already. You have a few options for this:
-
Download the appropriate archive from https://github.com/graalvm/mandrel/releases or https://github.com/graalvm/graalvm-ce-builds/releases, and unpack it like you would any other JDK.
-
Use platform-specific install tools like sdkman, homebrew, or scoop.
-
-
Configure the runtime environment. Set
GRAALVM_HOMEenvironment variable to the GraalVM installation directory, for example:export GRAALVM_HOME=$HOME/Development/graalvm/On macOS (not supported by Mandrel), point the variable to the
Homesub-directory:export GRAALVM_HOME=$HOME/Development/graalvm/Contents/Home/On Windows, you will have to go through the Control Panel to set your environment variables.
Installing via scoop will do this for you.
-
(Only for Oracle GraalVM CE/EE) Install the
native-imagetool usinggu install:${GRAALVM_HOME}/bin/gu install native-imageSome previous releases of GraalVM included the
native-imagetool by default. This is no longer the case; it must be installed as a second step after GraalVM itself is installed. Note: there is an outstanding issue using GraalVM with macOS Catalina. -
(Optional) Set the
JAVA_HOMEenvironment variable to the GraalVM installation directory.export JAVA_HOME=${GRAALVM_HOME} -
(Optional) Add the GraalVM
bindirectory to the pathexport PATH=${GRAALVM_HOME}/bin:$PATH
|
Issues using GraalVM with macOS Catalina
GraalVM binaries are not (yet) notarized for macOS Catalina as reported in this GraalVM issue. This means that you may see the following error when using Use the following command to recursively delete the |
Solution
We recommend that you follow the instructions in the next sections and package the application step by step. However, you can go right to the completed example.
Clone the Git repository: git clone https://github.com/quarkusio/quarkus-quickstarts.git, or download an archive.
The solution is located in the getting-started directory.
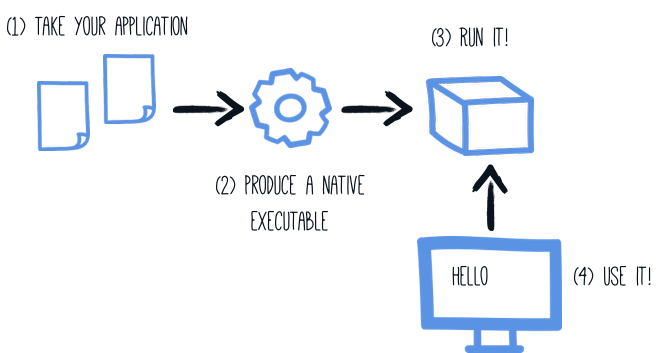
Producing a native executable
The native executable for our application will contain the application code, required libraries, Java APIs, and a reduced version of a VM. The smaller VM base improves the startup time of the application and produces a minimal disk footprint.
If you have generated the application from the previous tutorial, you can find in the pom.xml the following profile:
<profiles>
    <profile>
        <id>native</id>
        <properties>
            <quarkus.package.type>native</quarkus.package.type>
        </properties>
    </profile>
</profiles>|
You can provide custom options for the Another possibility is to include the You can find more information about how to configure the native image building process in the Configuring the Native Executable section below. |
We use a profile because, you will see very soon, packaging the native executable takes a few minutes. You could just pass -Dquarkus.package.type=native as a property on the command line, however it is better to use a profile as this allows native image tests to also be run.
Create a native executable using:
quarkus build --native./mvnw package -Dnative./gradlew build -Dquarkus.package.type=native|
Issues with packaging on Windows
The Microsoft Native Tools for Visual Studio must first be initialized before packaging. You can do this by starting
the Another solution is to write a script to do this for you: |
In addition to the regular files, the build also produces target/getting-started-1.0.0-SNAPSHOT-runner.
You can run it using: ./target/getting-started-1.0.0-SNAPSHOT-runner.
|
Java preview features
Java code that relies on preview features requires special attention.
To produce a native executable, this means that the |
Testing the native executable
Producing a native executable can lead to a few issues, and so it’s also a good idea to run some tests against the application running in the native file.
In the pom.xml file, the native profile contains:
<plugin>
    <groupId>org.apache.maven.plugins</groupId>
    <artifactId>maven-failsafe-plugin</artifactId>
    <version>${surefire-plugin.version}</version>
    <executions>
        <execution>
            <goals>
                <goal>integration-test</goal>
                <goal>verify</goal>
            </goals>
            <configuration>
                <systemPropertyVariables>
                    <native.image.path>${project.build.directory}/${project.build.finalName}-runner</native.image.path>
                    <java.util.logging.manager>org.jboss.logmanager.LogManager</java.util.logging.manager>
                    <maven.home>${maven.home}</maven.home>
                </systemPropertyVariables>
            </configuration>
        </execution>
    </executions>
</plugin>
This instructs the failsafe-maven-plugin to run integration-test and indicates the location of the produced native executable.
Then, open the src/test/java/org/acme/quickstart/GreetingResourceIT.java. It contains:
package org.acme.quickstart;


import io.quarkus.test.junit.QuarkusIntegrationTest;

@QuarkusIntegrationTest (1)
public class GreetingResourceIT extends GreetingResourceTest { (2)

    // Run the same tests

}| 1 | Use another test runner that starts the application from the native file before the tests.
The executable is retrieved using the native.image.path system property configured in the Failsafe Maven Plugin. |
| 2 | We extend our previous tests, but you can also implement your tests |
To see the GreetingResourceIT run against the native executable, use ./mvnw verify -Pnative:
$ ./mvnw verify -Pnative
...
[getting-started-1.0.0-SNAPSHOT-runner:18820]     universe:     587.26 ms
[getting-started-1.0.0-SNAPSHOT-runner:18820]      (parse):   2,247.59 ms
[getting-started-1.0.0-SNAPSHOT-runner:18820]     (inline):   1,985.70 ms
[getting-started-1.0.0-SNAPSHOT-runner:18820]    (compile):  14,922.77 ms
[getting-started-1.0.0-SNAPSHOT-runner:18820]      compile:  20,361.28 ms
[getting-started-1.0.0-SNAPSHOT-runner:18820]        image:   2,228.30 ms
[getting-started-1.0.0-SNAPSHOT-runner:18820]        write:     364.35 ms
[getting-started-1.0.0-SNAPSHOT-runner:18820]      [total]:  52,777.76 ms
[INFO]
[INFO] --- maven-failsafe-plugin:2.22.1:integration-test (default) @ getting-started ---
[INFO]
[INFO] -------------------------------------------------------
[INFO]  T E S T S
[INFO] -------------------------------------------------------
[INFO] Running org.acme.quickstart.GreetingResourceIT
Executing [/data/home/gsmet/git/quarkus-quickstarts/getting-started/target/getting-started-1.0.0-SNAPSHOT-runner, -Dquarkus.http.port=8081, -Dtest.url=http://localhost:8081, -Dquarkus.log.file.path=build/quarkus.log]
2019-04-15 11:33:20,348 INFO  [io.quarkus] (main) Quarkus 999-SNAPSHOT started in 0.002s. Listening on: http://[::]:8081
2019-04-15 11:33:20,348 INFO  [io.quarkus] (main) Installed features: [cdi, resteasy]
[INFO] Tests run: 2, Failures: 0, Errors: 0, Skipped: 0, Time elapsed: 1.387 s - in org.acme.quickstart.GreetingResourceIT
...|
By default, Quarkus waits for 60 seconds for the native image to start before automatically failing the native tests. This
duration can be changed using the |
|
This procedure was formerly accomplished using the |
By default, integration tests runs using the prod profile.
This can be overridden using the quarkus.test.native-image-profile property.
For example, in your application.properties file, add: quarkus.test.native-image-profile=test.
Alternatively, you can run your tests with: ./mvnw verify -Pnative -Dquarkus.test.native-image-profile=test.
However, don’t forget that when the native executable is built the prod profile is enabled.
So, the profile you enable this way must be compatible with the produced executable.
|
Java preview features
Java code that relies on preview features requires special attention.
To test a native executable, this means that the |
Excluding tests when running as a native executable
When running tests this way, the only things that actually run natively are you application endpoints, which you can only test via HTTP calls. Your test code does not actually run natively, so if you are testing code that does not call your HTTP endpoints, it’s probably not a good idea to run them as part of native tests.
If you share your test class between JVM and native executions like we advise above, you can mark certain tests
with the @DisabledOnNativeImage annotation in order to only run them on the JVM.
Testing an existing native executable
It is also possible to re-run the tests against a native executable that has already been built. To do this run
./mvnw test-compile failsafe:integration-test. This will discover the existing native image and run the tests against it using
failsafe.
If the process cannot find the native image for some reason, or you want to test a native image that is no longer in the
target directory you can specify the executable with the -Dnative.image.path= system property.
Creating a Linux executable without GraalVM installed
| Before going further, be sure to have a working container runtime (Docker, podman) environment. If you use Docker on Windows you should share your project’s drive at Docker Desktop file share settings and restart Docker Desktop. |
Quite often one only needs to create a native Linux executable for their Quarkus application (for example in order to run in a containerized environment) and would like to avoid the trouble of installing the proper GraalVM version in order to accomplish this task (for example, in CI environments it’s common practice to install as little software as possible).
To this end, Quarkus provides a very convenient way of creating a native Linux executable by leveraging a container runtime such as Docker or podman. The easiest way of accomplishing this task is to execute:
quarkus build --native -Dquarkus.native.container-build=true./mvnw package -Dnative -Dquarkus.native.container-build=true./gradlew build -Dquarkus.package.type=native -Dquarkus.native.container-build=true|
By default Quarkus automatically detects the container runtime. If you want to explicitely select the container runtime, you can do it with: For Docker: CLI
Maven
Gradle
For podman: CLI
Maven
Gradle
These are normal Quarkus config properties, so if you always want to build in a container
it is recommended you add these to your |
|
If you see the following invalid path error for your application JAR when trying to create a native executable using a container build, even though your JAR was built successfully, you’re most likely using a remote daemon for your container runtime. Error: Invalid Path entry getting-started-1.0.0-SNAPSHOT-runner.jar Caused by: java.nio.file.NoSuchFileException: /project/getting-started-1.0.0-SNAPSHOT-runner.jar In this case, use the parameter The reason for this is that the local build driver invoked through |
|
Building with Mandrel requires a custom builder image parameter to be passed additionally: CLI
Maven
Gradle
Please note that the above command points to a floating tag. It is highly recommended to use the floating tag, so that your builder image remains up-to-date and secure. If you absolutely must, you may hard-code to a specific tag (see here for available tags), but be aware that you won’t get security updates that way and it’s unsupported. |
Creating a container
Using the container-image extensions
By far the easiest way to create a container-image from your Quarkus application is to leverage one of the container-image extensions.
If one of those extensions is present, then creating a container image for the native executable is essentially a matter of executing a single command:
./mvnw package -Pnative -Dquarkus.native.container-build=true -Dquarkus.container-image.build=true-
quarkus.native.container-build=trueallows for creating a Linux executable without GraalVM being installed (and is only necessary if you don’t have GraalVM installed locally or your local operating system is not Linux) -
quarkus.container-image.build=trueinstructs Quarkus to create a container-image using the final application artifact (which is the native executable in this case)
See the Container Image guide for more details.
Manually using the micro base image
You can run the application in a container using the JAR produced by the Quarkus Maven Plugin. However, in this section we focus on creating a container image using the produced native executable.
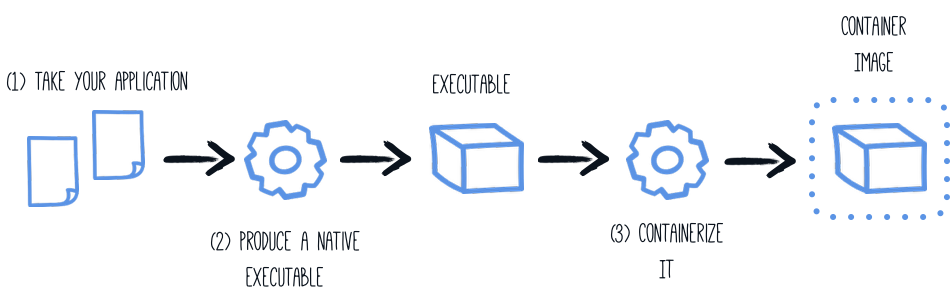
When using a local GraalVM installation, the native executable targets your local operating system (Linux, macOS, Windows etc). However, as a container may not use the same executable format as the one produced by your operating system, we will instruct the Maven build to produce an executable by leveraging a container runtime (as described in this section):
The produced executable will be a 64 bit Linux executable, so depending on your operating system it may no longer be runnable.
However, it’s not an issue as we are going to copy it to a container.
The project generation has provided a Dockerfile.native-micro in the src/main/docker directory with the following content:
FROM quay.io/quarkus/quarkus-micro-image:1.0
WORKDIR /work/
COPY target/*-runner /work/application
RUN chmod 775 /work
EXPOSE 8080
CMD ["./application", "-Dquarkus.http.host=0.0.0.0"]|
Quarkus Micro Image?
The Quarkus Micro Image is a small container image providing the right set of dependencies to run your native application. It is based on UBI Micro. This base image has been tailored to work perfectly in containers. You can read more about UBI images on: UBI images can be used without any limitations. This page explains how to extend the |
Then, if you didn’t delete the generated native executable, you can build the docker image with:
docker build -f src/main/docker/Dockerfile.native -t quarkus-quickstart/getting-started .And finally, run it with:
docker run -i --rm -p 8080:8080 quarkus-quickstart/getting-startedManually using the minimal base image
The project generation has also provided a Dockerfile.native in the src/main/docker directory with the following content:
FROM registry.access.redhat.com/ubi8/ubi-minimal:8.5
WORKDIR /work/
COPY target/*-runner /work/application
RUN chmod 775 /work
EXPOSE 8080
CMD ["./application", "-Dquarkus.http.host=0.0.0.0"]
The UBI minimal image is bigger than the micro one mentioned above.
It contains more utilities such as the microdnf package manager.
Using a multi-stage Docker build
The previous section showed you how to build a native executable using Maven or Gradle, but it requires you to have created the native executable first. In addition, this native executable must be a Linux 64 bits executable.
You may want to build the native executable directly in a container without having a final container containing the build tools. That approach is possible with a multi-stage Docker build:
-
The first stage builds the native executable using Maven or Gradle
-
The second stage is a minimal image copying the produced native executable
Such a multi-stage build can be achieved as follows:
Sample Dockerfile for building with Maven:
## Stage 1 : build with maven builder image with native capabilities
FROM quay.io/quarkus/ubi-quarkus-native-image:22.0.0.2-java11 AS build
COPY --chown=quarkus:quarkus mvnw /code/mvnw
COPY --chown=quarkus:quarkus .mvn /code/.mvn
COPY --chown=quarkus:quarkus pom.xml /code/
USER quarkus
WORKDIR /code
RUN ./mvnw -B org.apache.maven.plugins:maven-dependency-plugin:3.1.2:go-offline
COPY src /code/src
RUN ./mvnw package -Pnative

## Stage 2 : create the docker final image
FROM quay.io/quarkus/quarkus-micro-image:1.0
WORKDIR /work/
COPY --from=build /code/target/*-runner /work/application

# set up permissions for user `1001`
RUN chmod 775 /work /work/application \
  && chown -R 1001 /work \
  && chmod -R "g+rwX" /work \
  && chown -R 1001:root /work

EXPOSE 8080
USER 1001

CMD ["./application", "-Dquarkus.http.host=0.0.0.0"]
This multi-stage Docker build copies the Maven wrapper from the host machine.
The Maven wrapper (or the Gradle wrapper) is a convenient way to provide a specific version of Maven/Gradle.
It avoids having to create a base image with Maven and Gradle.
To provision the Maven Wrapper in your project, use: mvn -N org.apache.maven.plugins:maven-wrapper-plugin:3.1.0:wrapper.
|
Save this file in src/main/docker/Dockerfile.multistage as it is not included in the getting started quickstart.
Sample Dockerfile for building with Gradle:
## Stage 1 : build with maven builder image with native capabilities
FROM quay.io/quarkus/ubi-quarkus-native-image:22.0.0.2-java11 AS build
COPY --chown=quarkus:quarkus gradlew /code/gradlew
COPY --chown=quarkus:quarkus /code/gradle
COPY --chown=quarkus:quarkus build.gradle /code/
COPY --chown=quarkus:quarkus settings.gradle /code/
COPY --chown=quarkus:quarkus gradle.properties /code/
USER quarkus
WORKDIR /code
COPY src /code/src
RUN gradle -b /code/build.gradle buildNative

## Stage 2 : create the docker final image
FROM quay.io/quarkus/quarkus-micro-image:1.0
WORKDIR /work/
COPY --from=build /code/build/*-runner /work/application
RUN chmod 775 /work
EXPOSE 8080
CMD ["./application", "-Dquarkus.http.host=0.0.0.0"]
If you are using Gradle in your project, you can use this sample Dockerfile. Save it in src/main/docker/Dockerfile.multistage.
|
Before launching our Docker build, we need to update the default |
docker build -f src/main/docker/Dockerfile.multistage -t quarkus-quickstart/getting-started .And, finally, run it with:
docker run -i --rm -p 8080:8080 quarkus-quickstart/getting-started|
If you need SSL support in your native executable, you can easily include the necessary libraries in your Docker image. Please see our Using SSL With Native Executables guide for more information. |
To use Mandrel instead of GraalVM CE, update the FROM clause to: FROM quay.io/quarkus/ubi-quarkus-mandrel:$TAG AS build.
$TAG can be found on the Quarkus Mandrel Images Tags page.
|
Using a Distroless base image
| Distroless image support is experimental. |
If you are looking for small container images, the distroless approach reduces the size of the base layer. The idea behind distroless is the usage of a single and minimal base image containing all the requirements, and sometimes even the application itself.
Quarkus provides a distroless base image that you can use in your Dockerfile.
You only need to copy your application, and you are done:
FROM quay.io/quarkus/quarkus-distroless-image:1.0
COPY target/*-runner /application

EXPOSE 8080
USER nonroot

CMD ["./application", "-Dquarkus.http.host=0.0.0.0"]
Quarkus provides the quay.io/quarkus/quarkus-distroless-image:1.0 image.
It contains the required packages to run a native executable and is only 9Mb.
Just add your application on top of this image, and you will get a tiny container image.
Distroless images should not be used in production without rigorous testing.
Native executable compression
Quarkus can compress the produced native executable using UPX. More details on UPX Compression documentation.
Separating Java and native image compilation
In certain circumstances, you may want to build the native image in a separate step.
For example, in a CI/CD pipeline, you may want to have one step to generate the source that will be used for the native image generation and another step to use these sources to actually build the native executable.
For this use case, you can set the quarkus.package.type=native-sources.
This will execute the java compilation as if you would have started native compilation (-Pnative), but stops before triggering the actual call to GraalVM’s native-image.
$ ./mvnw clean package -Dquarkus.package.type=native-sourcesAfter compilation has finished, you find the build artifact in target/native-sources:
$ cd target/native-sources
$ ls
native-image.args  getting-started-1.0.0-SNAPSHOT-runner.jar lib
From the output above one can see that, in addition to the produced jar file and the associated lib directory, a text file named native-image.args was created.
This file holds all parameters (including the name of the JAR to compile) to pass along to GraalVM’s native-image command.
If you have GraalVM installed, you can start the native compilation by executing:
$ cd target/native-source
$ native-image $(cat native-image.args)
...
$ ls
native-image.args
getting-started-1.0.0-SNAPSHOT-runner
getting-started-1.0.0-SNAPSHOT-runner.build_artifacts.txt
getting-started-1.0.0-SNAPSHOT-runner.jar
The process for Gradle is analogous.
Running the build process in a container is also possible:
cd target/native-image
docker run \
  -it \
  --rm \
  --v $(pwd):/work (1)
  -w /work (2)
  --entrypoint bin/sh \
  quay.io/quarkus/ubi-quarkus-native-image:22.0.0.2-java11 \ (3)
-c "native-image $(cat native-image.args) -J-Xmx4g" (4)| 1 | Mount the host’s directory target/native-image to the container’s /work. Thus, the generated binary will also be written to this directory. |
| 2 | Switch the working directory to /work, which we have mounted in <1>. |
| 3 | Use the quay.io/quarkus/ubi-quarkus-native-image:22.0.0.2-java11 docker image introduced in Using a multi-stage Docker build to build the native image. |
| 4 | Call native-image with the content of file native-image.args as arguments. We also supply an additional argument to limit the process’s maximum memory to 4 Gigabytes (this may vary depending on the project being built and the machine building it). |
|
If you are running on a Windows machine, please keep in mind that the binary was created within a Linux docker container. Hence, the binary will not be executable on the host Windows machine. |
A high level overview of what the various steps of a CI/CD pipeline would look is the following:
-
Register the output of the step executing
./mvnw …command (i.e. directorytarget/native-image) as a build artifact, -
Require this artifact in the step executing the
native-image …command, and -
Register the output of the step executing the
native-image …command (i.e. files matchingtarget/*runner) as build artifact.
The environment executing step 1 only needs Java and Maven (or Gradle) installed, while the environment executing step 3 only needs a GraalVM installation (including the native-image feature).
Depending on what the final desired output of the CI/CD pipeline is, the generated binary might then be used to create a container image.
Debugging native executable
Starting with Oracle GraalVM 20.2 or Mandrel 20.1,
debug symbols for native executables can be generated for Linux environments
(Windows support is still under development, macOS is not supported).
These symbols can be used to debug native executables with tools such as gdb.
To generate debug symbols,
add -Dquarkus.native.debug.enabled=true flag when generating the native executable.
You will find the debug symbols for the native executable in a .debug file next to the native executable.
|
The generation of the When |
Aside from debug symbols,
setting -Dquarkus.native.debug.enabled=true flag generates a cache of source files
for any JDK runtime classes, GraalVM classes and application classes resolved during native executable generation.
This source cache is useful for native debugging tools,
to establish the link between the symbols and matching source code.
It provides a convenient way of making just the necessary sources available to the debugger/IDE when debugging a native executable.
Sources for third party jar dependencies, including Quarkus source code,
are not added to the source cache by default.
To include those, make sure you invoke mvn dependency:sources first.
This step is required in order to pull the sources for these dependencies,
and get them included in the source cache.
The source cache is located in the target/sources folder.
|
If running in the Or start e.g., |
For a more detailed guide about debugging native images please refer to the Native Reference Guide.
Configuring the Native Executable
There are a lot of different configuration options that can affect how the native executable is generated.
These are provided in application.properties the same as any other config property.
The properties are shown below:
What’s next?
This guide covered the creation of a native (binary) executable for your application. It provides an application exhibiting a swift startup time and consuming less memory. However, there is much more.
We recommend continuing the journey with the deployment to Kubernetes and OpenShift.