This guide demonstrates how your Quarkus application can use Kogito to add business automation and power it up with DMN decision support.
Kogito is a next generation business automation toolkit that originates from well known Open Source projects Drools (for business rules) and jBPM (for business processes). Kogito aims at providing a newer approach to business automation where the main message is to expose your business knowledge (processes, rules, decisions, predictions) in a domain specific way.
Prerequisites
To complete this guide, you need:
-
Roughly 15 minutes
-
An IDE (VSCode is preferred, with the Red Hat DMN Editor VSCode Extension)
-
JDK 11+ installed with
JAVA_HOMEconfigured appropriately -
Apache Maven 3.8.4
-
A working container runtime (Docker or Podman)
-
Optionally the Quarkus CLI if you want to use it
-
Optionally Mandrel or GraalVM installed and configured appropriately if you want to build a native executable (or Docker if you use a native container build)
DMN Editor
Kogito Tooling is currently supported via VSCode, web browsers and on other platforms:
- VSCode
-
Download and install the Red Hat DMN Editor VSCode Extension to edit and model process definitions from VSCode IDE.
- Online
-
To avoid any modeler installation you can use directly use DMN.new to author your DMN model through your favorite web browser.
- Other platforms
-
You can reference to Business Modeler Hub to download the latest platforms supported for the Kogito tooling releases.
Architecture
In this example, we build a very simple microservice which offers one REST endpoint:
-
/pricing
This endpoint will be automatically generated based on the defined DMN model.
Decision rules as a DMN model
A DMN model is an open standard for visual and semantic execution of declarative logic; DMN allows you to externalise decision logic into reusable pieces that can be easily used in declarative way. There are multiple ways of writing rules other than DMN, like: decision tables, decision trees, rules, etc.
For this example we focus on using the DMN (Decision Model and Notation) open standard to describe the decision rules.
Solution
We recommend that you follow the instructions in the next sections and create the application step by step. However, you can go right to the complete example.
Clone the Git repository: git clone https://github.com/quarkusio/quarkus-quickstarts.git, or download an archive.
The solution is located in the kogito-dmn-quickstart directory.
Creating the Maven Project
First, we need a new project. Create a new project with the following command:
This command generates a Maven project, importing the kogito-quarkus-decisions extension
that comes with all needed dependencies and configuration to equip your application
with business automation.
It also imports the resteasy-jackson extension that is needed for Kogito to expose REST services.
The kogito-quarkus-decisions is a specialized extension of the Kogito project focusing only on DMN support; if you want to
make use of the full capabilities offered by the Kogito platform, you can reference the generic Kogito extension of Quarkus.
If you already have your Quarkus project configured, you can add the kogito-quarkus-decisions extension
to your project by running the following command in your project base directory:
quarkus extension add 'dmn'./mvnw quarkus:add-extension -Dextensions="dmn"./gradlew addExtension --extensions="dmn"or alternatively:
quarkus extension add 'kogito-quarkus-decisions'./mvnw quarkus:add-extension -Dextensions="kogito-quarkus-decisions"./gradlew addExtension --extensions="kogito-quarkus-decisions"This will add the following to your build file:
<dependency>
    <groupId>org.kie.kogito</groupId>
    <artifactId>kogito-quarkus-decisions</artifactId>
</dependency>implementation("org.kie.kogito:kogito-quarkus-decisions")Authoring the DMN model
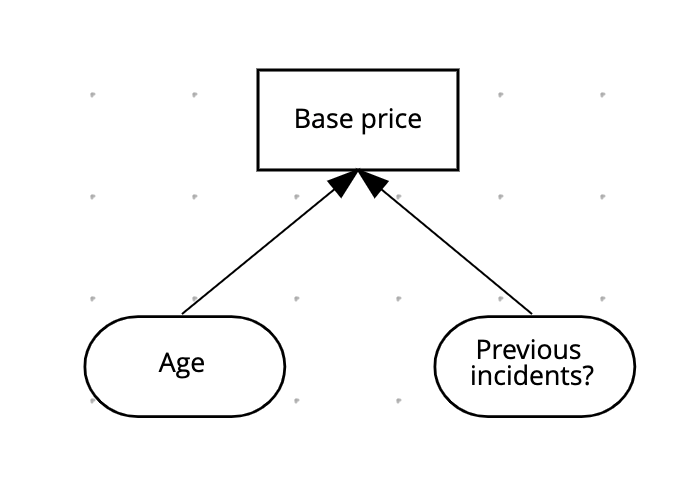
We will author a DMN model that will provide a base price quotation based on some criteria.
Create a new file pricing.dmn inside the src/main/resources/ directory of the generated project.
This model should consist of:
-
Age(InputData element, of typenumber) -
Previous incidents?(InputData element, of typeboolean) -
Base price(Decision element, of typenumber)
And the Decision Requirement Graph (DRG) should look like:
To get started quickly you may copy the DMN model definition file from the quickstart
The decision logic for the Base price Decision node shall be a DMN Decision Table with the following entries:

To author the DMN model yourself, just follow these steps:
-
drag an InputData node from the palette, name it
Ageand assign it typenumberusing the Properties panel. -
drag an InputData node from the palette, name it
Previous incidents?and assign it typebooleanusing the Properties panel. -
drag a Decision node from the palette, name it
Base priceand assign it typenumberusing the Properties panel. -
establish an
InformationRequirementedge fromAgetoBase pricenodes, by using the node palette by mouse overing near the element in the graph. -
establish an
InformationRequirementedge fromPrevious incidents?toBase pricenodes, by using the node palette by mouse overing near the element in the graph. -
select the Edit decision logic option for the node
Base price.-
select Decision Table as the decision logic for the node.
-
create the relevant rules (rows) entries as per the above screenshot.
-
-
save the file
For more information about DMN, you can reference the Kogito documentation at the links below.
Running and Using the Application
Running in Dev Mode
To run the microservice in dev mode, use:
quarkus dev./mvnw quarkus:dev./gradlew --console=plain quarkusDevRunning in JVM Mode
When you’re done playing with dev mode, you can run it as a standard Java application.
First compile it:
quarkus build./mvnw clean package./gradlew buildThen run it:
java -jar target/quarkus-app/quarkus-run.jarRunning in Native Mode
This same demo can be compiled into native code: no modifications required.
This implies that you no longer need to install a JVM on your production environment, as the runtime technology is included in the produced binary, and optimized to run with minimal resource overhead.
Compilation will take a bit longer, so this step is disabled by default; let’s build a native executable with the following command:
quarkus build --native./mvnw package -Dnative./gradlew build -Dquarkus.package.type=nativeNative compilation will always take some time to complete; then, you’ll be able to run this binary directly:
./target/kogito-dmn-quickstart-1.0.0-SNAPSHOT-runnerTesting the Application
To test your final decision service application, just send a request to the endpoint by supplying as JSON payload the expected inputs:
curl -X POST 'http://localhost:8080/pricing' \
-H 'Accept: application/json' \
-H 'Content-Type: application/json' \
-d '{ "Age": 47, "Previous incidents?": false }'
In the response, the Base price will be quoted -accordingly to the defined DMN model- for a total amount of 500; this is visible in the response payload:
{"Previous incidents?":false,"Age":47,"Base price":500}Using Test Scenario tool
Kogito allows to define visually test scenarios, and execute them as JUnit tests as part of the normal build of the Quarkus application.
To be able to use Test Scenario assets in your application, an additional dependency is required:
<dependency>
    <groupId>org.kie.kogito</groupId>
    <artifactId>kogito-scenario-simulation</artifactId>
    <scope>test</scope>
</dependency>testImplementation("org.kie.kogito:kogito-scenario-simulation")You can now create a KogitoScenarioJunitActivatorTest.java class file in the src/test/java/testscenario directory:
package testscenario;
@org.junit.runner.RunWith(org.kogito.scenariosimulation.runner.KogitoJunitActivator.class)
public class KogitoScenarioJunitActivatorTest {
}
This activator class is a custom JUnit runner that enables the execution of test scenario files in your application.
You can now create a PricingTest.scesim file in the src/test/resources directory:
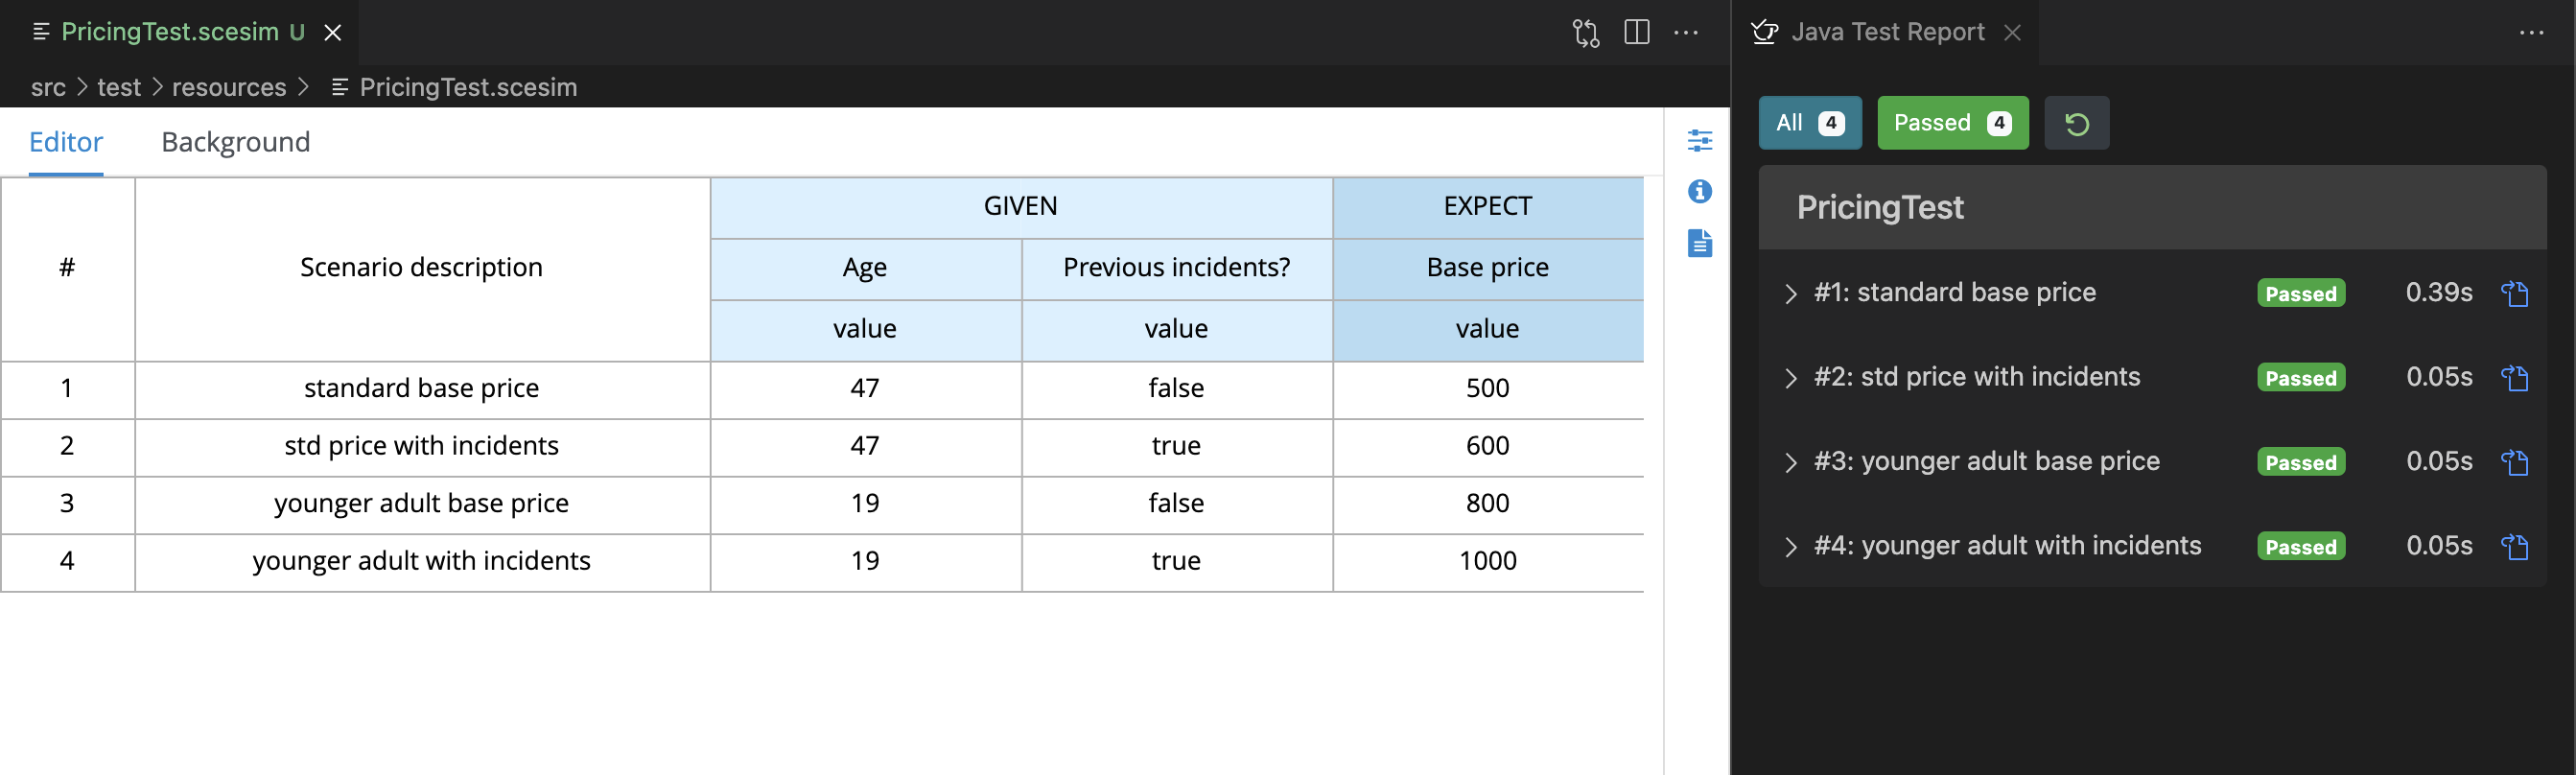
The test scenarios will be run as part of the JUnit test suite.
For more information about the Test Scenario tool, you can reference the Kogito documentation at the links below.
Where to go from here
This was a minimal example using a DMN modeling; as you can see the Kogito framework allow to quickly define a decision logic using a visual and standard notation, such as DMN, and create a fully functioning microservice on top of Quarkus!
To see additional capabilities of the Kogito platform, you can reference the Kogito documentation at the links below. This includes more detailed guides about integrating with Processes (BPMN2), Rules (Drools' DRL), Prediction (PMML), Test Scenario (visual notation for testing), assisted deployment to OpenShift, and many more.