This guide demonstrates how your Quarkus application can use Kogito to add business automation to power it up with business processes and rules.
Kogito is a next generation business automation toolkit that originates from well known Open Source projects Drools (for business rules) and jBPM (for business processes). Kogito aims at providing another approach to business automation where the main message is to expose your business knowledge (processes, rules, decisions, predictions) in a domain specific way.
Prerequisites
To complete this guide, you need:
-
Roughly 15 minutes
-
An IDE (VSCode is preferred with the Red Hat BPMN Editor VSCode Extension)
-
JDK 11+ installed with
JAVA_HOMEconfigured appropriately -
Apache Maven 3.8.4
-
A working container runtime (Docker or Podman)
-
Optionally the Quarkus CLI if you want to use it
-
Optionally Mandrel or GraalVM installed and configured appropriately if you want to build a native executable (or Docker if you use a native container build)
Install modelling plugins in your IDE
Kogito Tooling is currently supported in VSCode, Online and on other platforms:
- VSCode
-
Download and install the Red Hat BPMN Editor VSCode Extension to edit and model process definitions from VSCode IDE.
- Online
-
To avoid any modeler installation you can use directly use BPMN.new to design and model your process through your favorite web browser.
- Eclipse
-
To be able to make use of visual modelling of your processes, download Eclipse IDE and install from Marketplace Eclipse BPMN2 Modeller plugin (with jBPM Runtime Extension)
- Other platforms
-
You can go to Business Modeler Hub to download the latest platforms supported for the Kogito tooling releases.
Architecture
In this example, we build a very simple microservice which offers one REST endpoint:
-
/persons
This endpoint will be automatically generated based on business process, that in turn will make use of business rules to make certain decisions based on the data being processed.
Business process
The business process will be responsible for encapsulating business logic of our microservice. It should provide complete set of steps to achieve a business goal. At the same time this is the entry point to the service that can be consumed by clients.
Business rule
A business rule allows to externalise decision logic into reusable pieces that can be easily used in declarative way. There are multiple ways of writing rules like DMN models, decision tables, decision trees, rules, etc.
For this example we focus on the rule format backed by DRL (Drools Rule Language), but the same business logic may be expressed with other supported Kogito knowledge formats as well.
Solution
We recommend that you follow the instructions in the next sections and create the application step by step. However, you can go right to the complete example.
Clone the Git repository: git clone https://github.com/quarkusio/quarkus-quickstarts.git, or download an archive.
The solution is located in the kogito-quickstart directory.
Creating the Maven Project
First, we need a new project. Create a new project with the following command:
This command generates a Maven project, importing the kogito extension
that comes with all needed dependencies and configuration to equip your application
with business automation.
It also imports the resteasy-jackson extension that is needed for Kogito to expose REST services.
If you already have your Quarkus project configured, you can add the kogito extension
to your project by running the following command in your project base directory:
quarkus extension add 'kogito'./mvnw quarkus:add-extension -Dextensions="kogito"./gradlew addExtension --extensions="kogito"This will add the following to your build file:
<dependency>
    <groupId>org.kie.kogito</groupId>
    <artifactId>kogito-quarkus</artifactId>
</dependency>implementation("org.kie.kogito:kogito-quarkus")Writing the application
Let’s start by implementing the simple data object Person. As you can see from the source code below it is just a POJO:
package org.acme.kogito.model;

public class Person {

	private String name;
	private int age;
	private boolean adult;

	public String getName() {
		return name;
	}

	public void setName(String name) {
		this.name = name;
	}

	public int getAge() {
		return age;
	}

	public void setAge(int age) {
		this.age = age;
	}

	public boolean isAdult() {
		return adult;
	}

	public void setAdult(boolean adult) {
		this.adult = adult;
	}

	@Override
	public String toString() {
		return "Person [name=" + name + ", age=" + age + ", adult=" + adult + "]";
	}

}
Next, we create a rule file person-rules.drl inside the src/main/resources/org/acme/kogito folder of
the generated project.
package org.acme.kogito;

unit PersonUnit;

import org.acme.kogito.model.Person;

rule "Is adult"
when
    $person: /person[age > 18]
then
    modify($person) {
    	setAdult(true)
    };
end
This is really a simple rule that marks a person who is older that 18 years as an adult.
This example rule uses Rule Units, a new concept introduced in Kogito that helps users to encapsulate the set of rules and the facts against which those rules will be matched. The facts inserted will be inserted into a DataStore, a type-safe entry point. To make everything work, we need to define both the RuleUnit and the DataStore, by creating a new class PersonUnit inside src/main/java/org/acme/kogito directory:
package org.acme.kogito;

import org.acme.kogito.model.Person;
import org.kie.kogito.rules.DataSource;
import org.kie.kogito.rules.RuleUnitData;
import org.kie.kogito.rules.SingletonStore;

public class PersonUnit implements RuleUnitData {

    private SingletonStore<Person> person;

    public PersonUnit() {
        this(DataSource.createSingleton());
    }

    public PersonUnit(SingletonStore<Person> person) {
        this.person = person;
    }

    public SingletonStore<Person> getPerson() {
        return person;
    }

    public void setPerson(SingletonStore<Person> person) {
        this.person = person;
    }
}
Finally we create a business process that will make use of this rule and some other
activities to approve a given person. Using new item wizard (File → New → Other → BPMN2 Model)
create persons.bpmn inside src/main/resources/org/acme/kogito folder of the generated project.
This process should consist of
-
start event
-
business rule task
-
exclusive gateway
-
user task
-
end events
And should look like
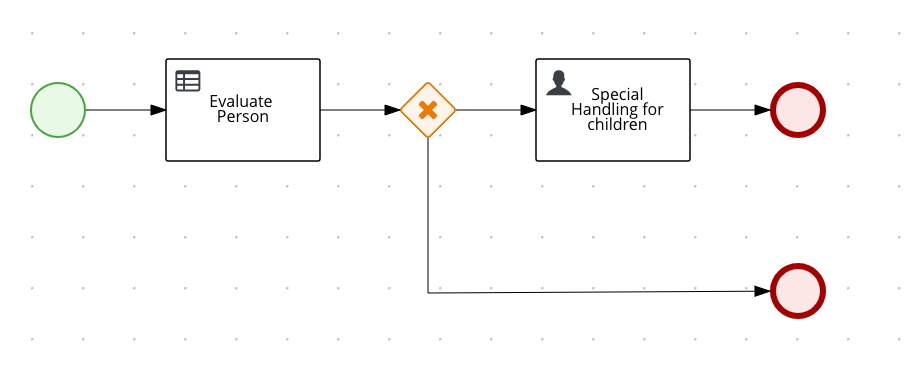
To get started quickly copy the process definition from the quickstart
To model this process yourself, just follow these steps (start event should be automatically added)
-
define a process variable with name
personof typeorg.acme.kogito.model.Person -
drag the Tasks → Business Rule Task from the palette and drop it next to start event, link it with start event
-
double click on the business rule task
-
on tab I/O Parameters, set data input and output (map
personprocess variable to input data with namepersonand same for data output) -
on tab Business Rule Task, set rule flow group to the FQCN value of the RuleUnit using the
unit:prefix (unit:org.acme.kogito.PersonUnit)
-
-
-
drag the Gateways → XOR gateway from the palette and drop it next to the business rule task, link it with rule task
-
drag the Tasks → User Task from the palette and drop it next to the gateway, link it with gateway
-
double click on the user task
-
on tak User Task, set task name to
ChildrenHandling -
on tab I/O Parameters, set data input (map
personprocess variable to input data with nameperson)
-
-
-
drag the End Events → End from the palette and drop it next to the user task, link it with the user task
-
drag the End Events → End from the palette and drop it next to the gateway, link it with the user task
-
double click on the gateway
-
on tab Gateway, set the diverging direction for the gateway
-
on tab Gateway, set conditions on sequence flow list
-
→ going to end event
return person.isAdult() == true;with languageJava -
→ going to user task
return person.isAdult() == false;with languageJava
-
-
-
save the file
Running and Using the Application
Running in Dev Mode
To run the microservice in dev mode, use:
quarkus dev./mvnw quarkus:dev./gradlew --console=plain quarkusDevRunning in JVM Mode
When you’re done playing with "dev-mode" you can run it as a standard Java application.
First compile it:
quarkus build./mvnw clean package./gradlew buildThen run it:
java -jar target/quarkus-app/quarkus-run.jarRunning in Native Mode
This same demo can be compiled into native code: no modifications required.
This implies that you no longer need to install a JVM on your production environment, as the runtime technology is included in the produced binary, and optimized to run with minimal resource overhead.
Compilation will take a bit longer, so this step is disabled by default; let’s build a native executable with the following command:
quarkus build --native./mvnw package -Dnative./gradlew build -Dquarkus.package.type=nativeAfter getting a cup of coffee, you’ll be able to run this binary directly:
./target/kogito-quickstart-1.0.0-SNAPSHOT-runnerTesting the Application
To test your application, just send request to the service with giving the person as JSON payload.
curl -X POST http://localhost:8080/persons \
    -H 'content-type: application/json' \
    -H 'accept: application/json' \
    -d '{"person": {"name":"John Quark", "age": 20}}'
In the response, the person should be approved as an adult and that should also be visible in the response payload.
{"id":"dace1d6a-a5fa-429d-b253-d6b66e265bbc","person":{"adult":true,"age":20,"name":"John Quark"}}You can also verify that there are no more active instances
curl -X GET http://localhost:8080/persons \
    -H 'content-type: application/json' \
    -H 'accept: application/json'
To verify the non adult case, send another request with the age set to less than 18
curl -X POST http://localhost:8080/persons \
    -H 'content-type: application/json' \
    -H 'accept: application/json' \
    -d '{"person": {"name":"Jenny Quark", "age": 15}}'
this time there should be one active instance, replace {uuid} with the id attribute taken from the response
curl -X GET http://localhost:8080/persons/{uuid}/tasks \
    -H 'content-type: application/json' \
    -H 'accept: application/json'
You can get the details of the task by calling another endpoint, replace uuids with the values taken from
the responses (uuid-1 is the process instance id and uuid-2 is the task instance id).
First corresponds to the process instance id and the other to the task instance id.
curl -X GET http://localhost:8080/persons/{uuid-1}/ChildrenHandling/{uuid-2} \
    -H 'content-type: application/json' \
    -H 'accept: application/json'
You can complete this person evaluation process instance by calling the same endpoint but with POST,
replace uuids with the values taken from the responses (uuid-1 is the process instance id and uuid-2 is the task instance id).
curl -X POST http://localhost:8080/persons/{uuid-1}/ChildrenHandling/{uuid-2} \
    -H 'content-type: application/json' \
    -H 'accept: application/json' \
    -d '{}'
Enabling persistence
Since 0.3.0 of Kogito, there is an option to enable persistence to preserve process instance state across application restarts. That supports long running process instances that can be resumed at any point in time.
Prerequisites
Kogito uses Infinispan as the persistence service so you need to have Infinispan server installed and running. Version of the Infinispan is aligned with Quarkus BOM so make sure the right version is installed.
Add dependencies to project
<dependency>
    <groupId>io.quarkus</groupId>
    <artifactId>quarkus-infinispan-client</artifactId>
</dependency>
<dependency>
    <groupId>org.kie.kogito</groupId>
    <artifactId>infinispan-persistence-addon</artifactId>
</dependency>implementation("io.quarkus:quarkus-infinispan-client")
implementation("org.kie.kogito:infinispan-persistence-addon")Configure connection with Infinispan server
Add following into the src/main/resources/application.properties file (create the file if it does not exist)
quarkus.infinispan-client.server-list=localhost:11222| Adjust the host and port number according to your Infinispan server installation. |
Test with enabled persistence
After configuring persistence on the project level, you can test and verify that the process instance state is preserved across application restarts.
-
start Infinispan server
-
build and run your project
-
execute non adult use case
curl -X POST http://localhost:8080/persons \
    -H 'content-type: application/json' \
    -H 'accept: application/json' \
    -d '{"person": {"name":"Jenny Quark", "age": 15}}'
You can also verify that there is active instance
curl -X GET http://localhost:8080/persons \
    -H 'content-type: application/json' \
    -H 'accept: application/json'
Restart your application while keeping Infinispan server up and running.
Check if you can see active instance which should have exactly the same id
curl -X GET http://localhost:8080/persons \
    -H 'content-type: application/json' \
    -H 'accept: application/json'
To learn more about persistence in Kogito visit this page
Using DMN decision tables
Kogito, like Drools, offers support of the DMN open standard for visual and semantic execution of declarative logic. The business rules in this example may be also expressed using DMN decision tables or other visual paradigm of DMN, instead of DRL and RuleUnits.
For more information about DMN support in Kogito, you may refer to the companion Quarkus guide specific to Kogito DMN support on Quarkus, or the Kogito documentation in the links below.
Using legacy decision tables
Kogito allows to define DRL rules as decision tables using the Microsoft Excel file formats. To be able to use such assets in your application, an additional dependency is required:
<dependency>
    <groupId>org.kie.kogito</groupId>
    <artifactId>drools-decisiontables</artifactId>
</dependency>implementation("org.kie.kogito:drools-decisiontables")Once the dependency is added to the project, decision tables in xls or xlsx format can be properly handled.