This guide demonstrates how your Quarkus application can authorize a bearer token access to protected resources using Keycloak Authorization Services.
The quarkus-keycloak-authorization extension is based on quarkus-oidc and provides a policy enforcer that enforces access to protected resources based on permissions managed by Keycloak and currently can only be used with the Quarkus OIDC service applications.
It provides a flexible and dynamic authorization capability based on Resource-Based Access Control.
In other words, instead of explicitly enforcing access based on some specific access control mechanism (e.g.: RBAC), you just check whether or not a request is allowed to access a resource based on its name, identifier or URI.
By externalizing authorization from your application, you are allowed to protect your applications using different access control mechanisms as well as avoid re-deploying your application every time your security requirements change, where Keycloak will be acting as a centralized authorization service from where your protected resources and their associated permissions are managed.
See the Using OpenID Connect to Protect Service Applications guide for more information about Bearer Token authentication mechanism. It is important to realize that it is the Bearer Token authentication mechanism which does the authentication and creates a security identity - while the quarkus-keycloak-authorization extension is responsible for applying a Keycloak Authorization Policy to this identity based on the current request path and other policy settings.
If you are already familiar with Keycloak, you’ll notice that the extension is basically another adapter implementation but specific for Quarkus applications. Otherwise, you can find more information in the Keycloak documentation.
Prerequisites
To complete this guide, you need:
-
Roughly 15 minutes
-
An IDE
-
JDK 11+ installed with
JAVA_HOMEconfigured appropriately -
Apache Maven 3.8.4
-
A working container runtime (Docker or Podman)
-
Optionally the Quarkus CLI if you want to use it
-
Optionally Mandrel or GraalVM installed and configured appropriately if you want to build a native executable (or Docker if you use a native container build)
Architecture
In this example, we build a very simple microservice which offers two endpoints:
-
/api/users/me -
/api/admin
These endpoints are protected and can only be accessed if a client is sending a bearer token along with the request, which must be valid (e.g.: signature, expiration and audience) and trusted by the microservice.
The bearer token is issued by a Keycloak Server and represents the subject to which the token was issued for. For being an OAuth 2.0 Authorization Server, the token also references the client acting on behalf of the user.
The /api/users/me endpoint can be accessed by any user with a valid token.
As a response, it returns a JSON document with details about the user where these details are obtained from the information carried on the token.
This endpoint is protected with RBAC (Role-Based Access Control) and only users granted with the user role can access this endpoint.
The /api/admin endpoint is protected with RBAC (Role-Based Access Control) and only users granted with the admin role can access it.
This is a very simple example using RBAC policies to govern access to your resources. However, Keycloak supports other types of policies that you can use to perform even more fine-grained access control. By using this example, you’ll see that your application is completely decoupled from your authorization policies with enforcement being purely based on the accessed resource.
Solution
We recommend that you follow the instructions in the next sections and create the application step by step. However, you can go right to the completed example.
Clone the Git repository: git clone https://github.com/quarkusio/quarkus-quickstarts.git, or download an archive.
The solution is located in the security-keycloak-authorization-quickstart directory.
Creating the Project
First, we need a new project. Create a new project with the following command:
This command generates a project, importing the keycloak-authorization extension which is an implementation of a Keycloak Adapter for Quarkus applications and provides all the necessary capabilities to integrate with a Keycloak Server and perform bearer token authorization.
If you already have your Quarkus project configured, you can add the oidc and keycloak-authorization extensions
to your project by running the following command in your project base directory:
quarkus extension add 'oidc,keycloak-authorization'./mvnw quarkus:add-extension -Dextensions="oidc,keycloak-authorization"./gradlew addExtension --extensions="oidc,keycloak-authorization"This will add the following to your build file:
<dependency>
    <groupId>io.quarkus</groupId>
    <artifactId>quarkus-oidc</artifactId>
</dependency>
<dependency>
    <groupId>io.quarkus</groupId>
    <artifactId>quarkus-keycloak-authorization</artifactId>
</dependency>implementation("io.quarkus:quarkus-oidc")
implementation("io.quarkus:quarkus-keycloak-authorization")Let’s start by implementing the /api/users/me endpoint.
As you can see from the source code below it is just a regular JAX-RS resource:
package org.acme.security.keycloak.authorization;

import javax.inject.Inject;
import javax.ws.rs.GET;
import javax.ws.rs.Path;

import org.jboss.resteasy.annotations.cache.NoCache;

import io.quarkus.security.identity.SecurityIdentity;

@Path("/api/users")
public class UsersResource {

    @Inject
    SecurityIdentity identity;

    @GET
    @Path("/me")
    @NoCache
    public User me() {
        return new User(identity);
    }

    public static class User {

        private final String userName;

        User(SecurityIdentity identity) {
            this.userName = identity.getPrincipal().getName();
        }

        public String getUserName() {
            return userName;
        }
    }
}
The source code for the /api/admin endpoint is also very simple:
package org.acme.security.keycloak.authorization;

import javax.ws.rs.GET;
import javax.ws.rs.Path;
import javax.ws.rs.Produces;
import javax.ws.rs.core.MediaType;

import io.quarkus.security.Authenticated;

@Path("/api/admin")
@Authenticated
public class AdminResource {

    @GET
    @Produces(MediaType.TEXT_PLAIN)
    public String admin() {
        return "granted";
    }
}
Note that we did not define any annotation such as @RolesAllowed to explicitly enforce access to a resource.
The extension will be responsible to map the URIs of the protected resources you have in Keycloak and evaluate the permissions accordingly, granting or denying access depending on the permissions that will be granted by Keycloak.
Configuring the application
The OpenID Connect extension allows you to define the adapter configuration using the application.properties file which should be located at the src/main/resources directory.
# OIDC Configuration
%prod.quarkus.oidc.auth-server-url=https://localhost:8543/realms/quarkus
quarkus.oidc.client-id=backend-service
quarkus.oidc.credentials.secret=secret
quarkus.oidc.tls.verification=none

# Enable Policy Enforcement
quarkus.keycloak.policy-enforcer.enable=true

# Tell Dev Services for Keycloak to import the realm file
# This property is not effective when running the application in JVM or Native modes
quarkus.keycloak.devservices.realm-path=quarkus-realm.json
Adding a %prod. profile prefix to quarkus.oidc.auth-server-url ensures that Dev Services for Keycloak will launch a container for you when the application is run in a dev mode. See Running the Application in Dev mode section below for more information.
|
By default, applications using the quarkus-oidc extension are marked as a service type application (see quarkus.oidc.application-type). This extension also supports only web-app type applications but only if the access token returned as part of the authorization code grant response is marked as a source of roles: quarkus.oidc.roles.source=accesstoken (web-app type applications check ID token roles by default).
|
Starting and Configuring the Keycloak Server
Do not start the Keycloak server when you run the application in a dev mode - Dev Services for Keycloak will launch a container. See Running the Application in Dev mode section below for more information.
|
To start a Keycloak Server you can use Docker and just run the following command:
docker run --name keycloak -e KEYCLOAK_ADMIN=admin -e KEYCLOAK_ADMIN_PASSWORD=admin -p 8543:8443 -v "$(pwd)"/config/keycloak-keystore.jks:/etc/keycloak-keystore.jks quay.io/keycloak/keycloak:{keycloak.version} start --hostname-strict=false --https-key-store-file=/etc/keycloak-keystore.jkswhere keycloak.version should be set to 17.0.0 or higher.
You should be able to access your Keycloak Server at localhost:8543.
Log in as the admin user to access the Keycloak Administration Console.
Username should be admin and password admin.
Import the realm configuration file to create a new realm. For more details, see the Keycloak documentation about how to create a new realm.
After importing the realm you can see the resource permissions:
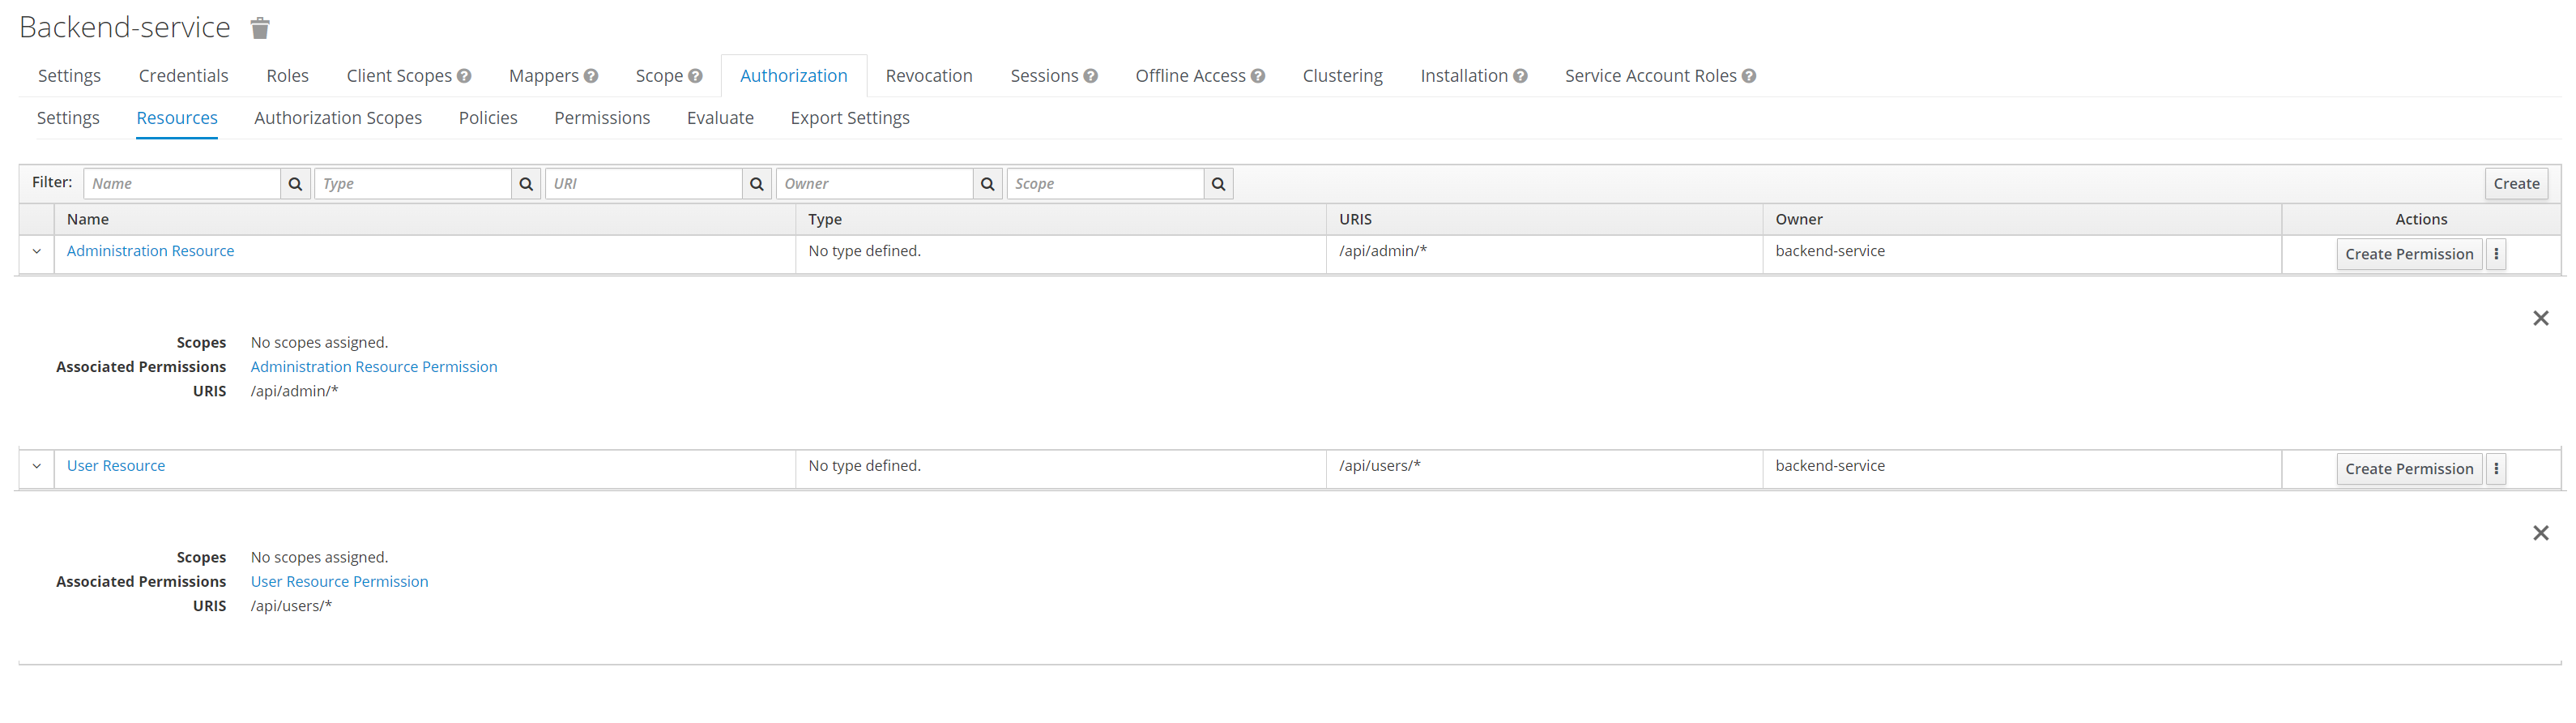
It explains why the endpoint has no @RolesAllowed annotations - the resource access permissions are set directly in Keycloak.
Running the Application in Dev mode
To run the application in dev mode, use:
quarkus dev./mvnw quarkus:dev./gradlew --console=plain quarkusDevDev Services for Keycloak will launch a Keycloak container and import a quarkus-realm.json.
Open a Dev UI available at /q/dev and click on a Provider: Keycloak link in an OpenID Connect Dev UI card.
You will be asked to login into a Single Page Application provided by OpenID Connect Dev UI:
-
Login as
alice(password:alice) who only has aUser Permissionto access the/api/users/meresource-
accessing
/api/adminwill return403 -
accessing
/api/users/mewill return200
-
-
Logout and login as
admin(password:admin) who has bothAdmin Permissionto access the/api/adminresource andUser Permissionto access the/api/users/meresource-
accessing
/api/adminwill return200 -
accessing
/api/users/mewill return200
-
Running the Application in JVM mode
When you’re done playing with the dev mode" you can run it as a standard Java application.
First compile it:
quarkus build./mvnw clean package./gradlew buildThen run it:
java -jar target/quarkus-app/quarkus-run.jarRunning the Application in Native Mode
This same demo can be compiled into native code: no modifications required.
This implies that you no longer need to install a JVM on your production environment, as the runtime technology is included in the produced binary, and optimized to run with minimal resource overhead.
Compilation will take a bit longer, so this step is disabled by default; let’s build again by enabling the native profile:
quarkus build --native./mvnw package -Dnative./gradlew build -Dquarkus.package.type=nativeAfter getting a cup of coffee, you’ll be able to run this binary directly:
./target/security-keycloak-authorization-quickstart-runnerTesting the Application
See Running the Application in Dev mode section above about testing your application in a dev mode.
You can test the application launched in JVM or Native modes with curl.
The application is using bearer token authorization and the first thing to do is obtain an access token from the Keycloak Server in order to access the application resources:
export access_token=$(\
    curl --insecure -X POST https://localhost:8543/realms/quarkus/protocol/openid-connect/token \
    --user backend-service:secret \
    -H 'content-type: application/x-www-form-urlencoded' \
    -d 'username=alice&password=alice&grant_type=password' | jq --raw-output '.access_token' \
 )
The example above obtains an access token for user alice.
Any user is allowed to access the
http://localhost:8080/api/users/me endpoint
which basically returns a JSON payload with details about the user.
curl -v -X GET \
  http://localhost:8080/api/users/me \
  -H "Authorization: Bearer "$access_token
The http://localhost:8080/api/admin endpoint can only be accessed by users with the admin role.
If you try to access this endpoint with the previously issued access token, you should get a 403 response from the server.
 curl -v -X GET \
   http://localhost:8080/api/admin \
   -H "Authorization: Bearer "$access_token
In order to access the admin endpoint you should obtain a token for the admin user:
export access_token=$(\
    curl --insecure -X POST https://localhost:8543/realms/quarkus/protocol/openid-connect/token \
    --user backend-service:secret \
    -H 'content-type: application/x-www-form-urlencoded' \
    -d 'username=admin&password=admin&grant_type=password' | jq --raw-output '.access_token' \
 )
Checking Permissions Programmatically
In some cases, you may want to programmatically check whether or not a request is granted to access a protected resource. By
injecting a SecurityIdentity instance in your beans, you are allowed to check permissions as follows:
import io.quarkus.security.identity.SecurityIdentity;
import io.smallrye.mutiny.Uni;

@Path("/api/protected")
public class ProtectedResource {

    @Inject
    SecurityIdentity identity;


    @GET
    public Uni<List<Permission>> get() {
        return identity.checkPermission(new AuthPermission("{resource_name}")).onItem()
                .transform(granted -> {
                    if (granted) {
                        return identity.getAttribute("permissions");
                    }
                    throw new ForbiddenException();
                });
    }
}
Injecting the Authorization Client
In some cases, you may want to use the Keycloak Authorization Client Java API to perform
specific operations like managing resources and obtaining permissions directly from Keycloak. For that, you can inject a
AuthzClient instance into your beans as follows:
public class ProtectedResource {
    @Inject
    AuthzClient authzClient;
}
Mapping Protected Resources
By default, the extension is going to fetch resources on-demand from Keycloak where their URI are used to map the resources in your application that should be protected.
If you want to disable this behavior and fetch resources during startup, you can use the following configuration:
quarkus.keycloak.policy-enforcer.lazy-load-paths=falseNote that, depending on how many resources you have in Keycloak the time taken to fetch them may impact your application startup time.
More About Configuring Protected Resources
In the default configuration, Keycloak is responsible for managing the roles and deciding who can access which routes.
To configure the protected routes using the @RolesAllowed annotation or the application.properties file, check the Using OpenID Connect Adapter to Protect JAX-RS Applications and Security Authorization guides. For more details, check the Security guide.
Access to Public Resources
If you’d like to access a public resource without quarkus-keycloak-authorization trying to apply its policies to it then you need to create a permit HTTP Policy configuration in application.properties as documented in the Security Authorization guide.
Disabling a policy check using a Keycloak Authorization Policy such as:
quarkus.keycloak.policy-enforcer.paths.1.path=/api/public
quarkus.keycloak.policy-enforcer.paths.1.enforcement-mode=DISABLED
is no longer required.
If you’d like to block an access to the public resource to anonymous users then you can create an enforcing Keycloak Authorization Policy:
quarkus.keycloak.policy-enforcer.paths.1.path=/api/public-enforcing
quarkus.keycloak.policy-enforcer.paths.1.enforcement-mode=ENFORCING
Note only the default tenant configuration applies when controlling an anonymous access to the public resource is required.
Multi-Tenancy
It is possible to configure multiple policy enforcer configurations, one per each tenant, similarly to how it can be done for Multi-Tenant OpenID Connect Service Applications.
For example:
quarkus.keycloak.policy-enforcer.enable=true

# Default Tenant
quarkus.oidc.auth-server-url=${keycloak.url}/realms/quarkus
quarkus.oidc.client-id=quarkus-app
quarkus.oidc.credentials.secret=secret

quarkus.keycloak.policy-enforcer.enforcement-mode=PERMISSIVE
quarkus.keycloak.policy-enforcer.paths.1.name=Permission Resource
quarkus.keycloak.policy-enforcer.paths.1.path=/api/permission
quarkus.keycloak.policy-enforcer.paths.1.claim-information-point.claims.static-claim=static-claim

# Service Tenant

quarkus.oidc.service-tenant.auth-server-url=${keycloak.url}/realms/quarkus
quarkus.oidc.service-tenant.client-id=quarkus-app
quarkus.oidc.service-tenant.credentials.secret=secret

quarkus.keycloak.service-tenant.policy-enforcer.enforcement-mode=PERMISSIVE
quarkus.keycloak.service-tenant.policy-enforcer.paths.1.name=Permission Resource Service
quarkus.keycloak.service-tenant.policy-enforcer.paths.1.path=/api/permission
quarkus.keycloak.service-tenant.policy-enforcer.paths.1.claim-information-point.claims.static-claim=static-claim


# WebApp Tenant

quarkus.oidc.webapp-tenant.auth-server-url=${keycloak.url}/realms/quarkus
quarkus.oidc.webapp-tenant.client-id=quarkus-app
quarkus.oidc.webapp-tenant.credentials.secret=secret
quarkus.oidc.webapp-tenant.application-type=web-app
quarkus.oidc.webapp-tenant.roles.source=accesstoken

quarkus.keycloak.webapp-tenant.policy-enforcer.enforcement-mode=PERMISSIVE
quarkus.keycloak.webapp-tenant.policy-enforcer.paths.1.name=Permission Resource WebApp
quarkus.keycloak.webapp-tenant.policy-enforcer.paths.1.path=/api/permission
quarkus.keycloak.webapp-tenant.policy-enforcer.paths.1.claim-information-point.claims.static-claim=static-claim
Configuration Reference
The configuration is based on the official Keycloak Policy Enforcer Configuration. If you are looking for more details about the different configuration options, please take a look at this documentation,